Hand Tool Storage Cabinet and Tool Review is sponsored by The Home Depot. I have been compensated for my time and provided with product. All ideas and opinions are my own. This post contains some affiliate links for your convenience. Click here to read my full disclosure policy. During this build, I’ll be reviewing the Ridgid Drill/Impact combo, Bosch multipurpose drill bits and Husky small drawer organizer and will share my thoughts on these tools.
I have been slowly chipping away on projects in what I lovingly call “The Great Garage Makeover!” When I say slowly, I mean like molasses on a cold day, running up hill, kind of slowly (but I’m getting there). The goal is to create a place for everything and have everything in it’s place. For my tool organization, I’m working on a series of 3 large storage cabinets with unique features to keep me organized. Plus they’ll have doors, so it’ll give my garage a clean look and minimize the amount of sawdust that piles on EVERYTHING! This first cabinet is mainly for storing and organizing hand tools, wrenches, etc. I’ll have a cabinet for finishing supplies and a 3rd for power tools!

The unfinished version of the hand tool storage cabinet.

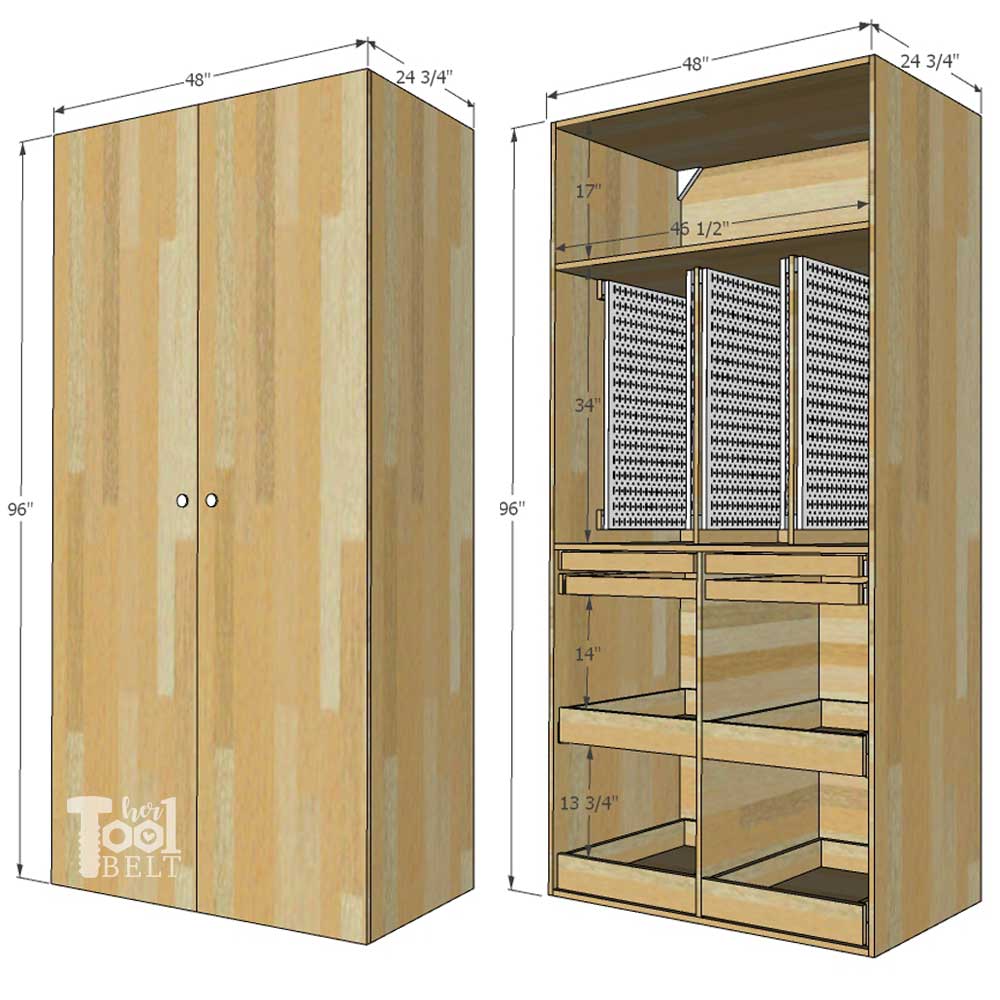
Cabinet with Doors Closed // Cabinet with Doors Open // Cabinet with Shelves Pulled Out
How to Build a Hand Tool Storage Cabinet for the Garage
Materials
- 6 sheets of 3/4″ plywood (4′ x 8′) – there are various grades of plywood that will affect the cost, this is birch plywood
- 2 – 1 x 2 x 8′ boards – if doing the metal peg board sliders
- 8 sets of 22″ drawer slides – optional for drawers
- 6 sets of 16″ drawer slides – optional for pull out metal pegboard
- 6 pieces of 16″ x 32″ Wall Control metal pegboard
- sandpaper
- wood finish or paint – as desired. I used white exterior on the doors and oil based polyurethane on everything else.
- 1 1/4″ brad nails – optional
Tools Used
- Table saw or circular saw and optional rip cut and miter saw
- 35 mm forstner bit for the concealed hinges
- 1/16″ bit for pilot holes
- pencil
- clamps – as needed
- brad nailer
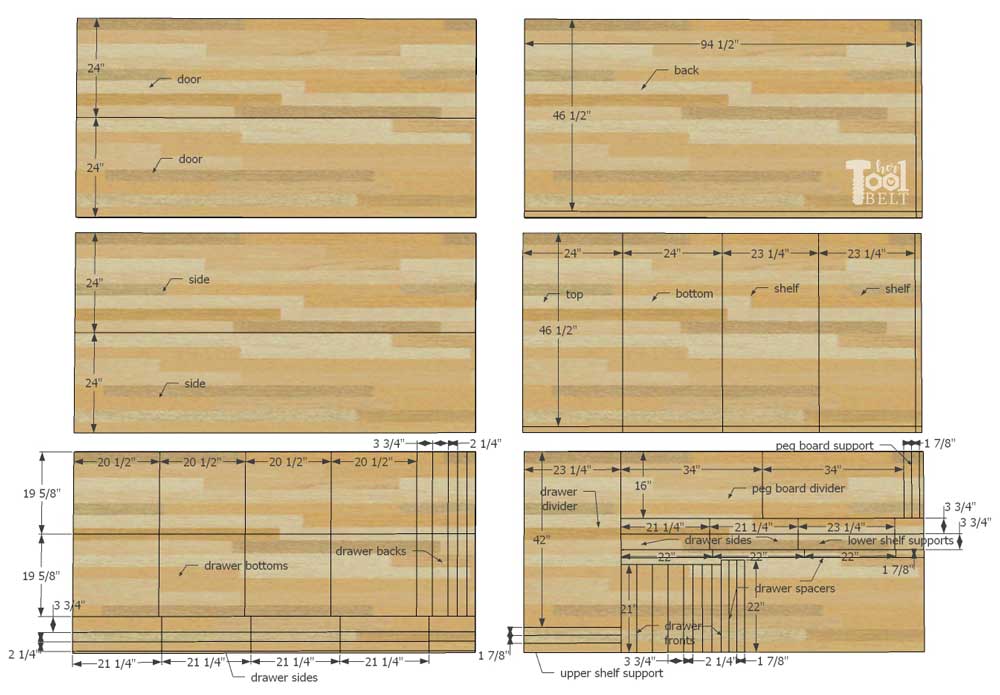
Hand Tool Organization Storage Cabinet Cut List
- 4 – 3/4″ x 24″ x 96″ (doors, sides) Note: Even though the list says 24″, just cut the sheet in half. The width will be more like 23 15/16″ because of the width of the blade.
- 1 – 3/4″ x 46 1/2″ x 94 1/2″ (back)
- 2 – 3/4″ x 24″ x 46 1/2″ (top/bottom) (same width as the sides, about 23 15/16″)
- 2 – 3/4″ x 23 1/4″ x 46 1/2″ (shelves)
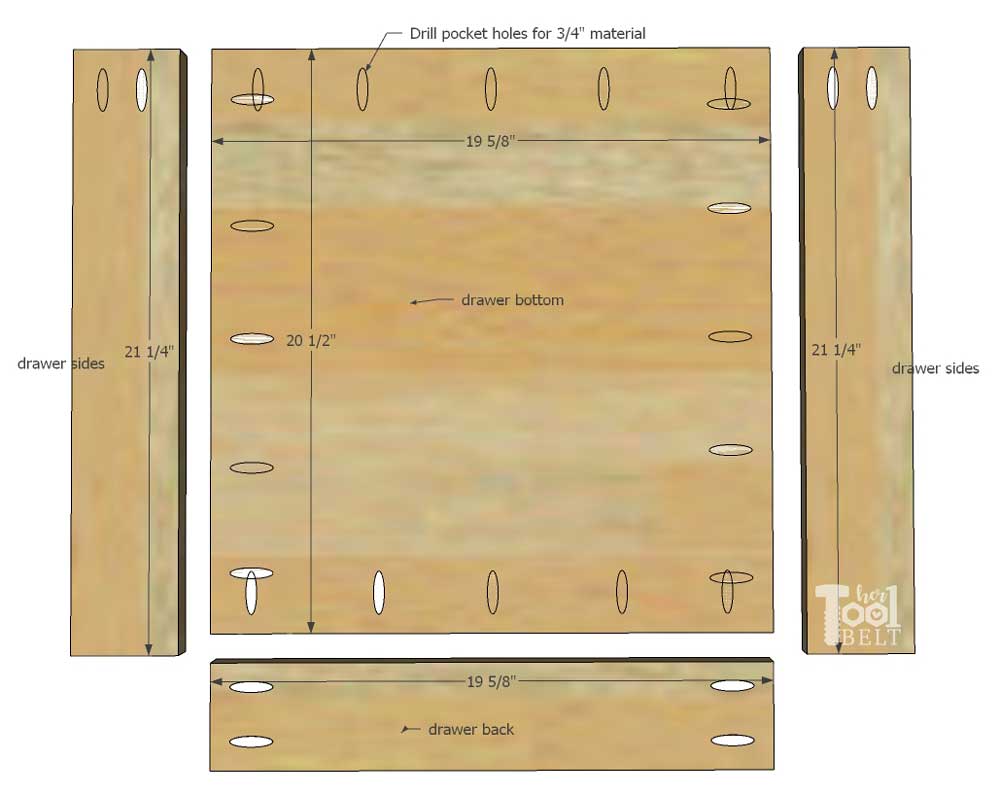
- 8 – 3/4″ x 19 5/8″ x 20 1/2″ (drawer bottoms)
- 4 – 3/4″ x 3 3/4″ x 19 5/8″ (large drawer backs)
- 8 – 3/4″ x 3 3/4″ x 21 1/4″ (large drawer sides
- 4 – 3/4″ x 3 3/4″ x 21″ cut to fit (large drawer fronts)
- 4 – 3/4″ x 2 1/4″ x 19 5/8″ (small drawer backs)
- 8 – 3/4″ x 2 1/4″ x 21 1/4″ (small drawer sides)
- 4 – 3/4″ x 2 1/4″ x 21″ cut to fit (small drawer fronts)
- 1 – 3/4″ x 23 1/4″ x 42″ (drawer divider)
- 2 – 3/4″ x 16″ x 34″ (peg board dividers)
- 2 – 3/4″ x 1 7/8″ x 23 1/4″ (upper shelf supports)
- 2 – 3/4″ x 3 3/4″ x 23 1/4″ (lower shelf supports)
- 2 – 3/4″ x 1 7/8″ x 16″ (peg board supports)
- 6 – 3/4″ x 1 7/8″ x 22″ (drawer spacers) – Note: some plywoods are not exactly 3/4″ thick, additional shimming may be needed on drawer slides or you can wait to build drawers until you know the exact width of drawer needed. Remember to subtract 2 x 1/2″ for drawer slides.
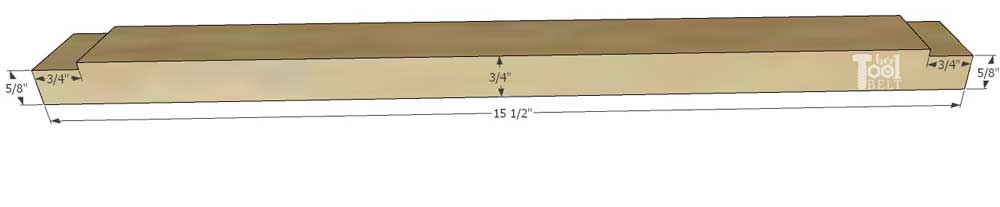
- 12 – 3/4″ x 1 1/2″ x 15 1/2″ from solid wood not plywood (peg board filler) if doing the metal peg board sliders (not shown in cut list below)
Hand Tool Storage Cabinet Cut Diagram
I used a table saw to cut up the plywood

However a circular saw and straight edge will work just fine.

Drill pocket holes for main cabinet
Once the pieces for the main cabinet body are cut, drill pocket holes for 3/4″ material in the following pieces and according to sketch.
- All 4 sides of back
- 3 sides of peg board dividers (shown as top divider)
- 2 ends of drawer divider
- 2 ends of upper and lower shelves
- 1 long edge of top and bottom pieces
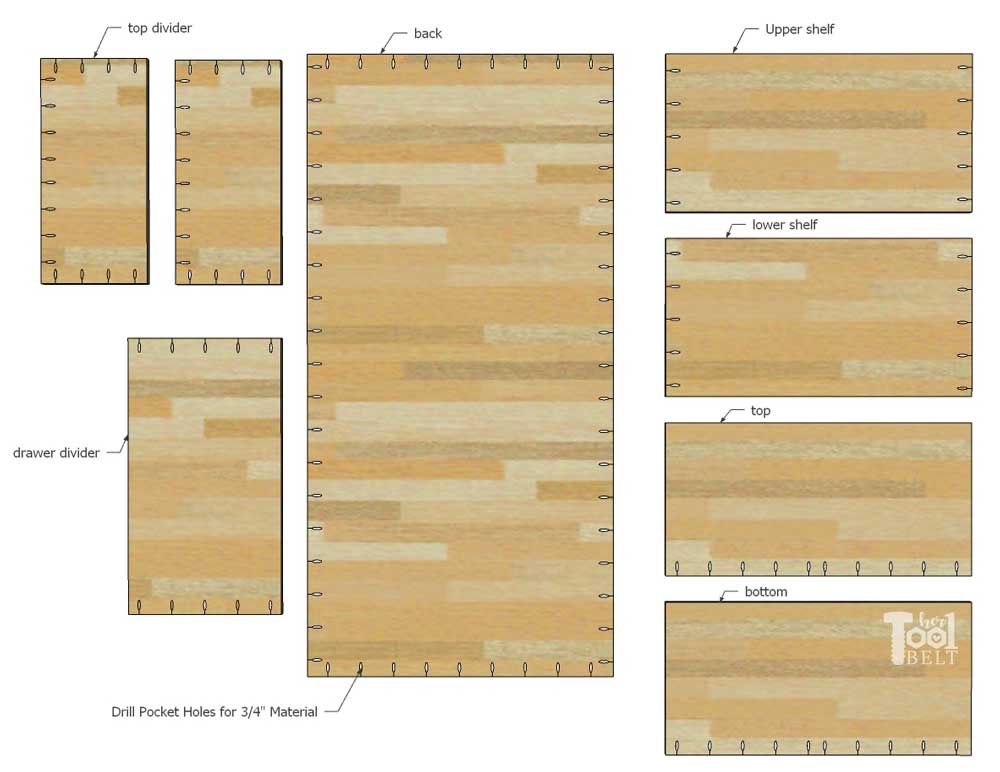
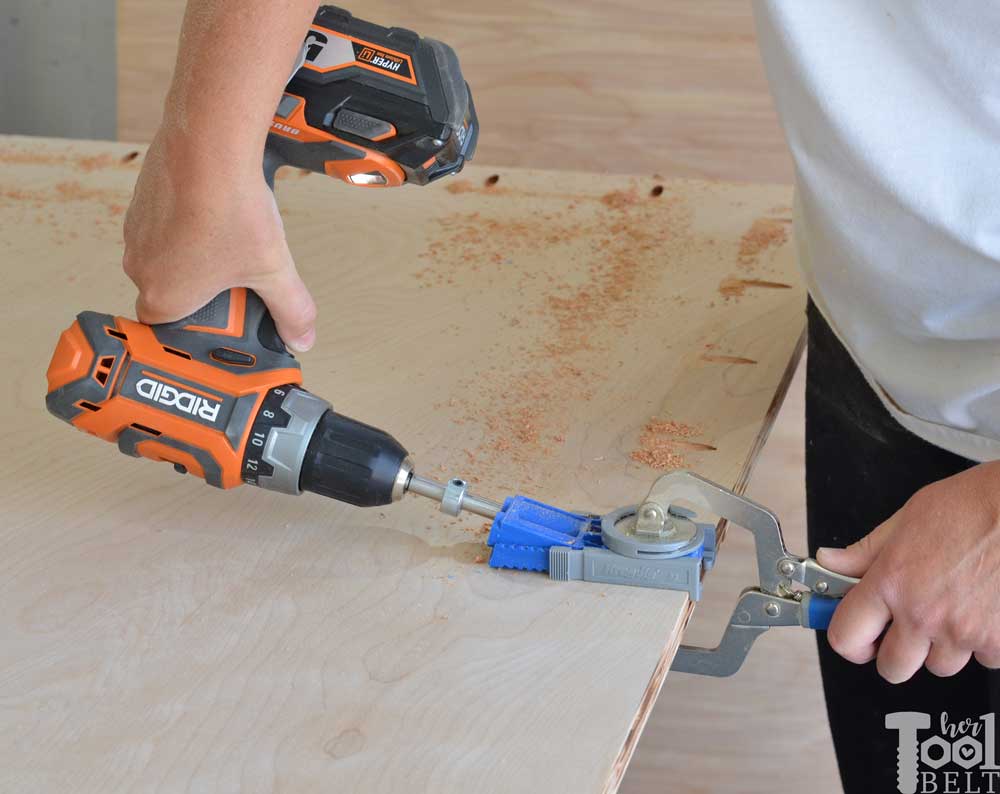
Any of the pocket hole jig varieties should work. I used the R3 because it’s a little more portable and small than the other jigs.
Tool Storage Cabinet Assembly
Surprisingly assembling the cabinet goes pretty quickly, although it is beastly. I really like the Ridgid drill/impact combo, keep the drill bit in the drill and drive the screws with the impact. My favorite feature of the impact is the torque settings 1-2-3. I found 2 to be perfect for driving pocket hole screws, but when I really needed torque when working with Treks on the back deck, 3 was crucial. Nice work Ridgid.
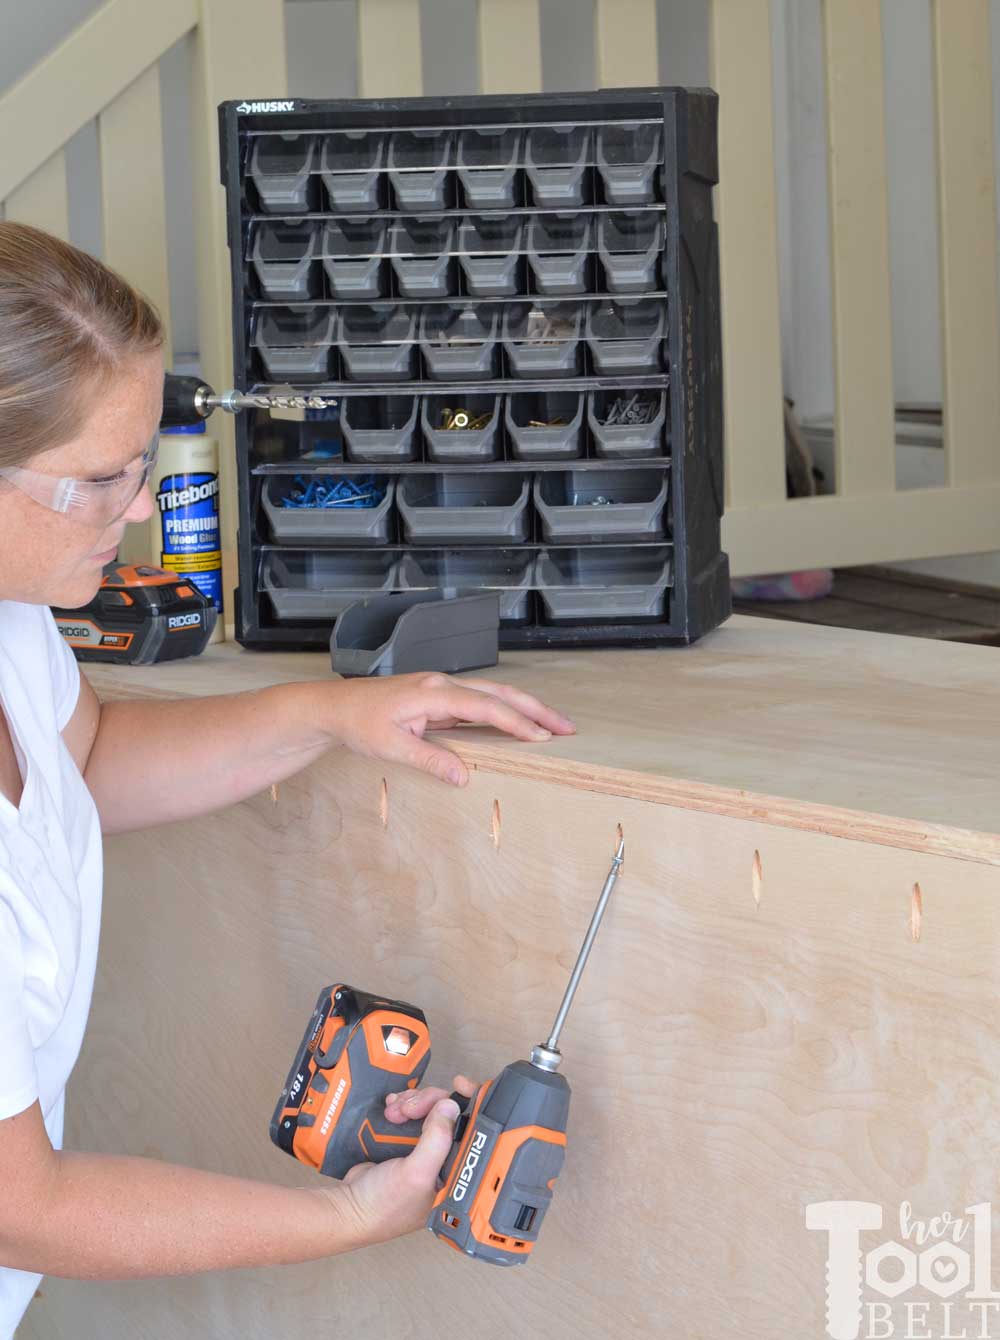
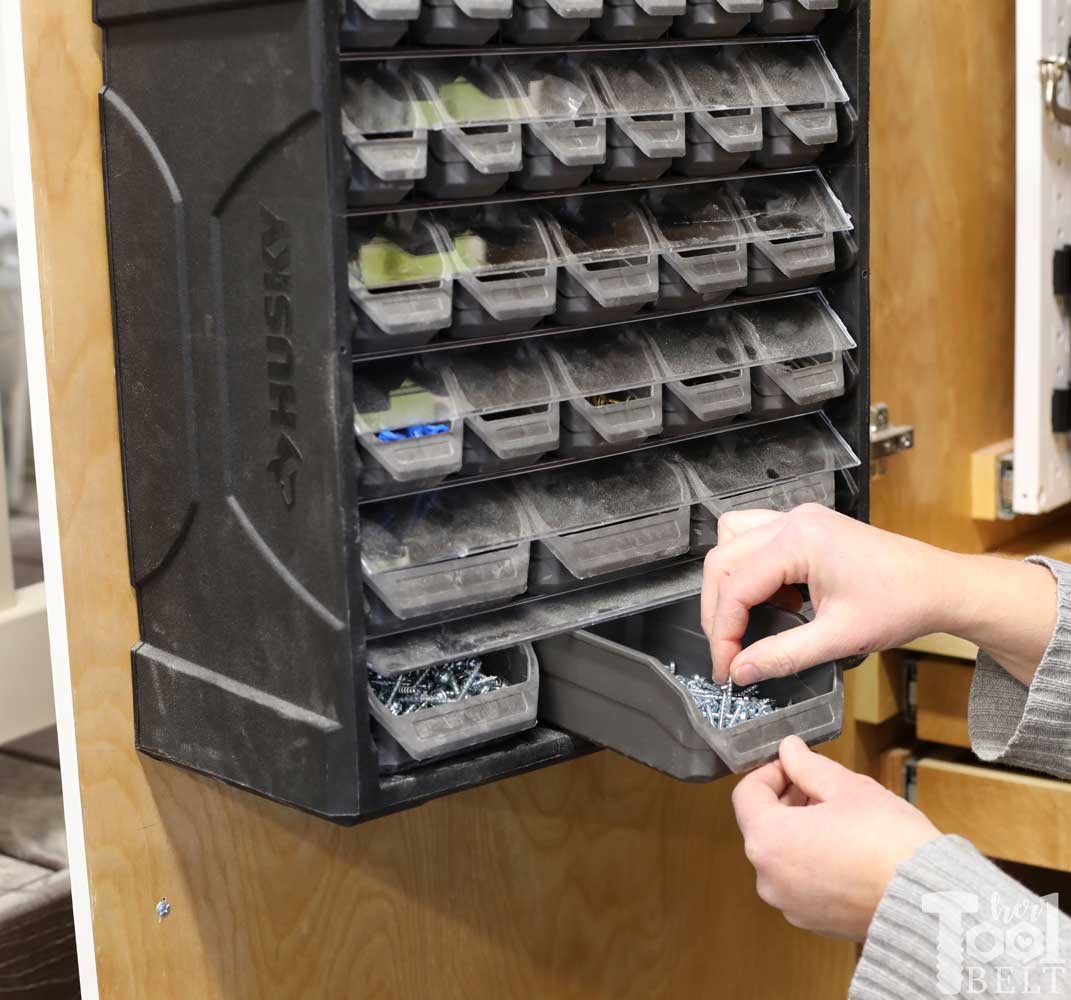
I also love the Husky small parts organizer for having a handy and easily portable way to organize screws and such. Just pull out the drawer of screws needed and off you go!
Assembly with pocket holes
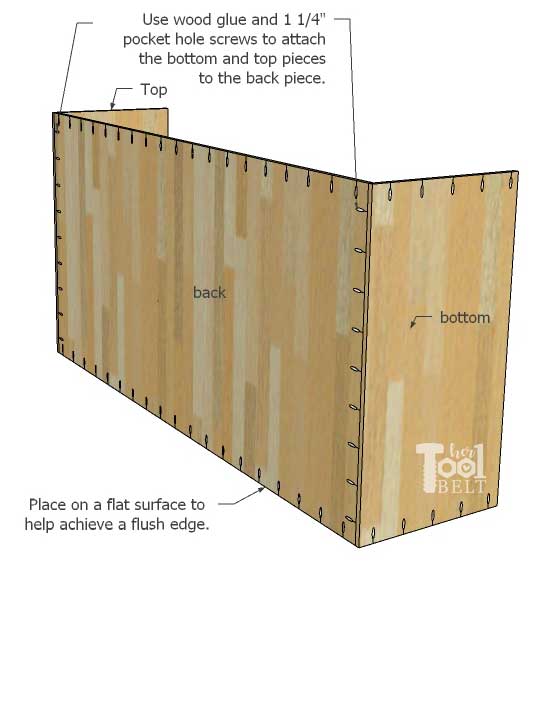
To start off the assembly, I stood the back piece up on a flat surface (ie garage floor) and clamped the top and bottom piece to the back. Make use all pocket holes face the outside of the cabinet. Use wood glue and 1 1/4″ pocket hole screws to attach the bottom and top pieces to the back. Try to keep the edges flush.
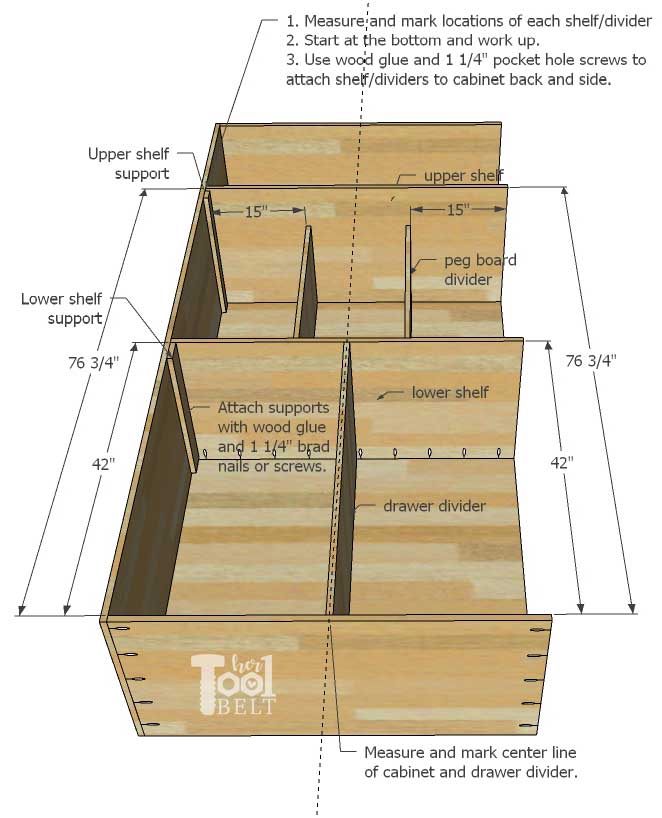
To make assembly easier, I added all of the shelves and dividers now.
- For the drawer divider, measure and mark the center line of the cabinet and divider. Mark reference marks to line up with and attach with wood glue and 1 1/4″ pocket hole screws.
- Attach a lower shelf support at 42″ up from the bottom, use wood glue and 1 1/4″ brad nails or screws.
- Attach the lower shelf 42″ up from the bottom, use wood glue and 1 1/4″ pocket holes to secure it in place. Mark the center and secure the drawer divider to the lower shelf with wood glue and pocket hole screws.
- Mark over 15″ from each cabinet side and secure the peg board dividers with wood glue and 1 1/4″ pocket hole screws.
- Attach a upper shelf support at 76 3/4″ up from the bottom, use wood glue and 1 1/4″ brad nails or screws.
- Attach the upper shelf 76 3/4″ up from the bottom. use wood glue and 1 1/4″ pocket holes screws to secure it in place.
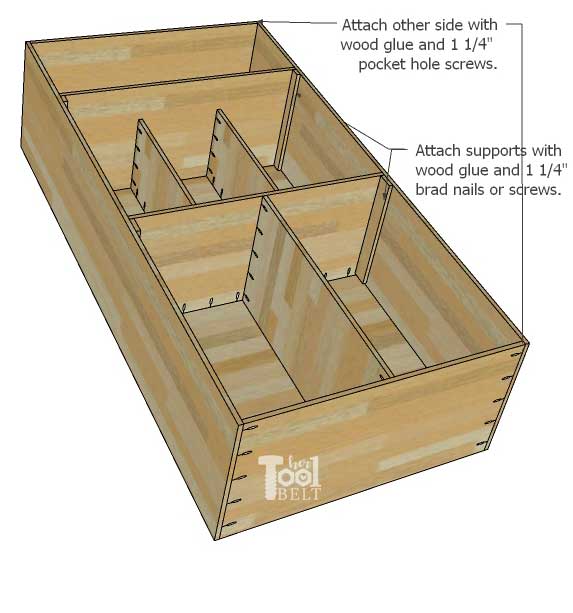
Finally attach the other side to the top and bottom pieces with wood glue and 1 1/4″ pocket hole screws. Attach a lower shelf support at 42″ up from the bottom and upper shelf support at 76 3/4″ up from the bottom.
Building the tool cabinet drawers
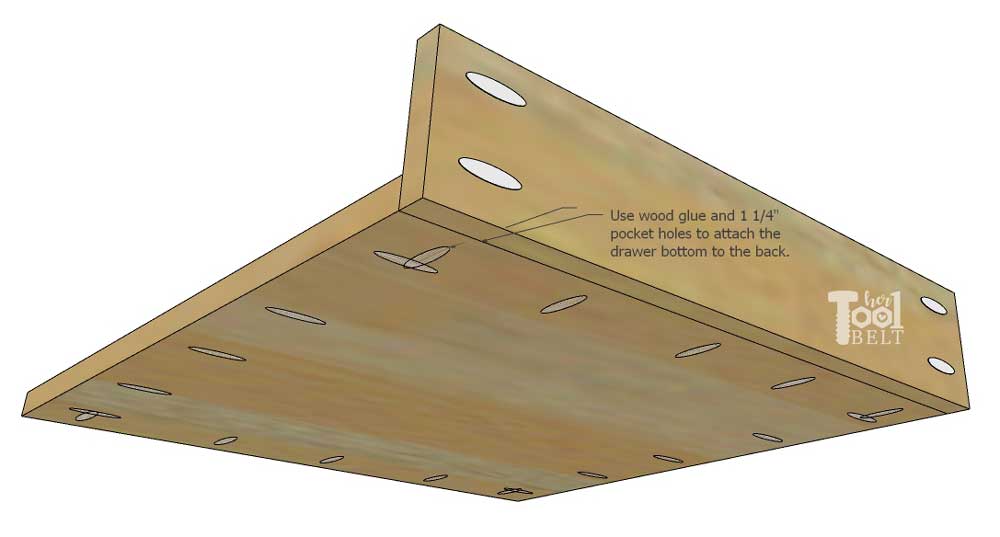
The drawer construction is the same, whether it is the taller 3 3/4″ or shorter 2 1/4″ drawer. Start out by drilling pocket holes for 3/4″ material. Drill the pocket holes all around the drawer bottom, on 2 ends of the drawer back and 1 end of each drawer side.
Next attach the back to the bottom. Make sure the back pocket holes are facing to the back. Then use wood glue and 1 1/4″ pocket hole screws to attach the back to the bottom. Make the bottoms and sides flush.
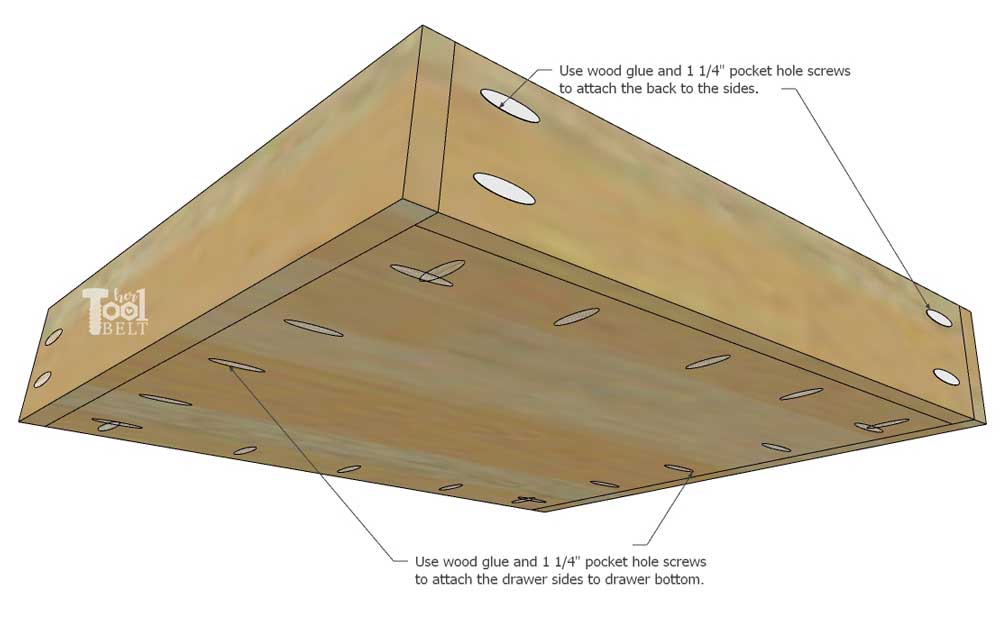
Then attach the two sides to the bottom and back pieces. Make sure the side pocket holes are facing out and are facing front. Use wood glue and 1 1/4″ pocket hole screws to attach the sides to the bottom and back.
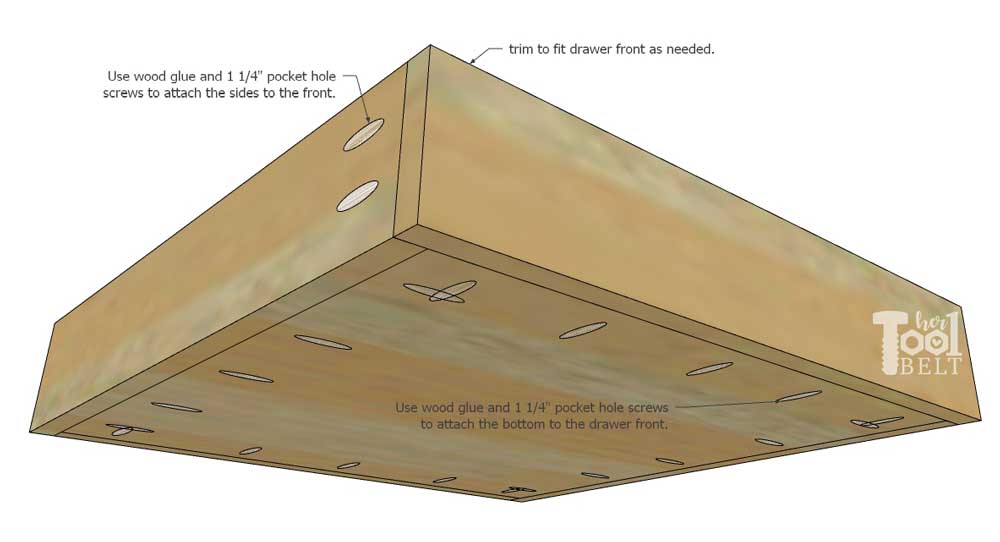
Finally attach the front to the drawer. Use wood glue and 1 1/4″ pocket hole screws to attach the bottom to the front piece and the sides to the front piece.
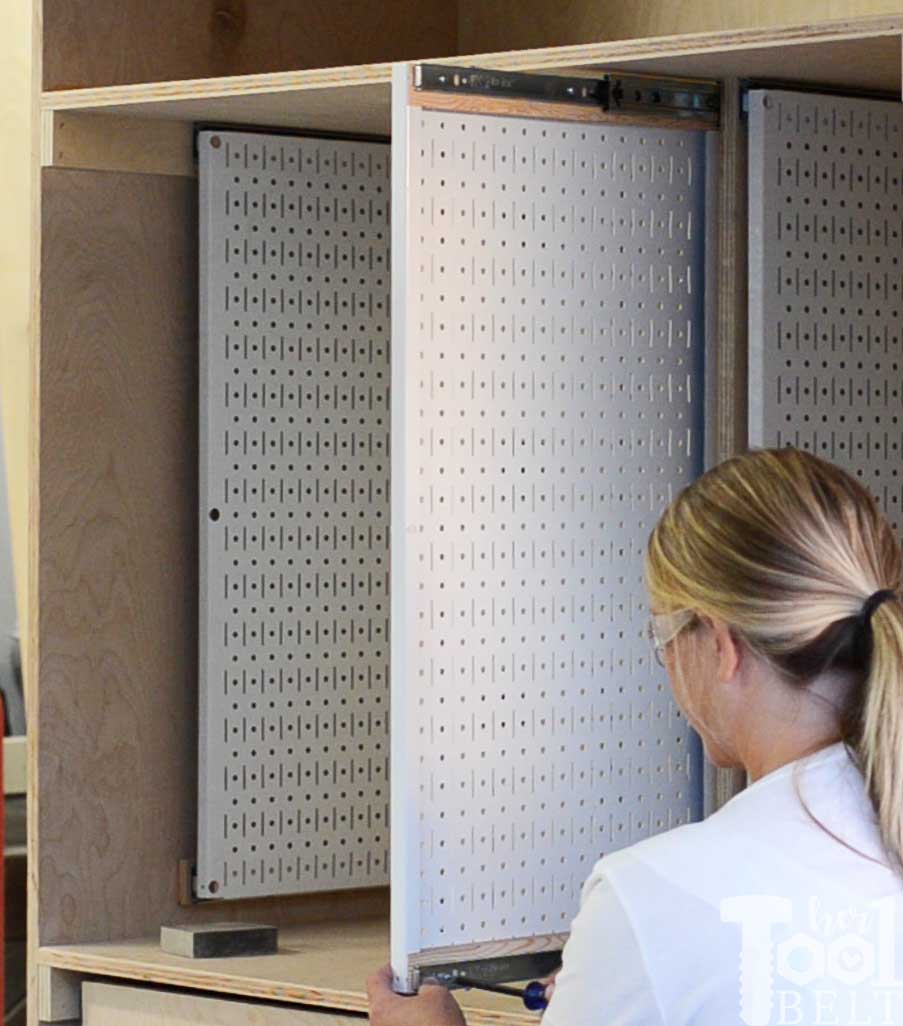
Attaching the Metal Pegboard Sliders
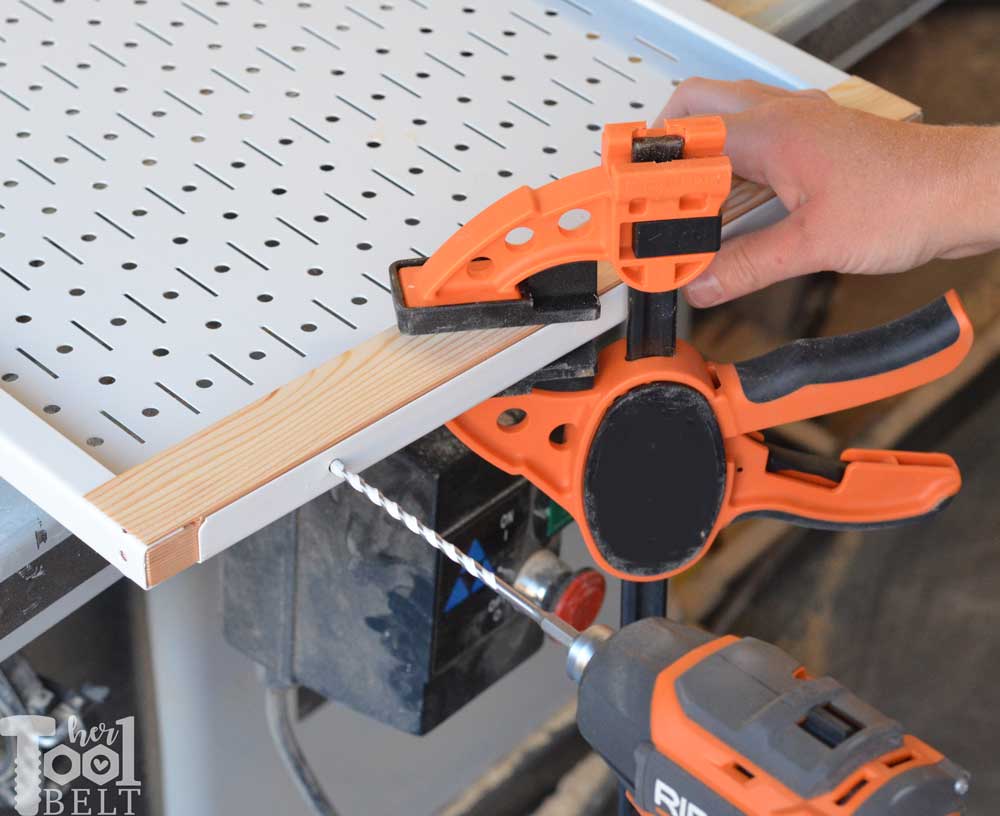
The metal peg boards are folded metal and create a 5/8″ pocket. Therefore we need to add some scrap wood as a filler to attach the drawer slides to. If you have 5/8″ material, that would be ideal to use, or you’ll need to cut some rabbets on the end of the filler boards. I used the table saw, but the rabbets could be made with a chisel, recip saw, scroll saw, etc. If you use 1×2 material, cut is 15 1/2″ long and make a rabbet leaving 5/8″ x 3/4″ material on the ends.
Then slide the filler pieces in the end of the metal pegboard. One end of the pegboard has holes already drilled in, attach the filler wood with 2 – 1 1/4″ pocket hole screws. The other end will need a couple holes drilled. I used these slick Bosch multipurpose tungsten carbide bits, they can drill metal, wood, cement, tile, etc. Perfect for this situation. Once the holes are drilled, secure the wood filler to the pegboard with a couple 1 1/4″ pocket hole screws.
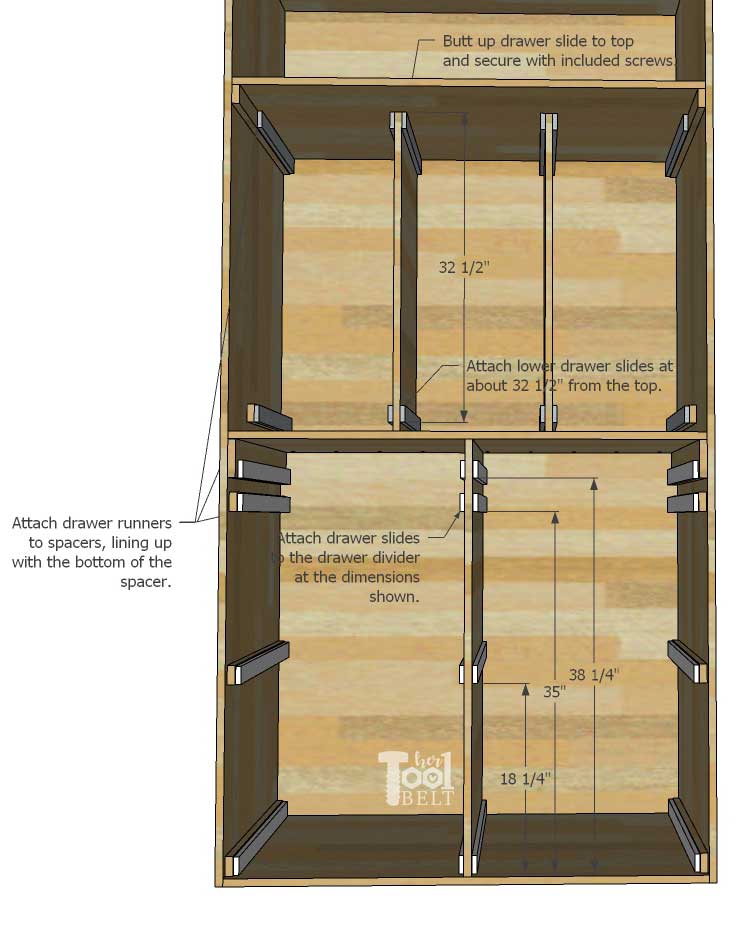
Add spacers/supports
When designing the tool storage cabinet, I wasn’t sure the clearance I would need on the sides for the doors to be oven and drawers pulled out. Because I wanted to use concealed hinges, I knew there would be some interference, so I planned to have the drawer runners attach to spacers on the sides to give plenty of clearance.
Measure and mark the locations for the spacers/supports. Attach the spacers/supports with wood glue and 1 1/4″ brad nails or screws.
Then measure and mark the same placements for the drawer slides on the dividers. The bottoms of the drawer slides will line up with the bottom of the spacers. The drawer slides should be butted up against the back piece. The upper peg board drawer slides will be flush with the top of the divider.
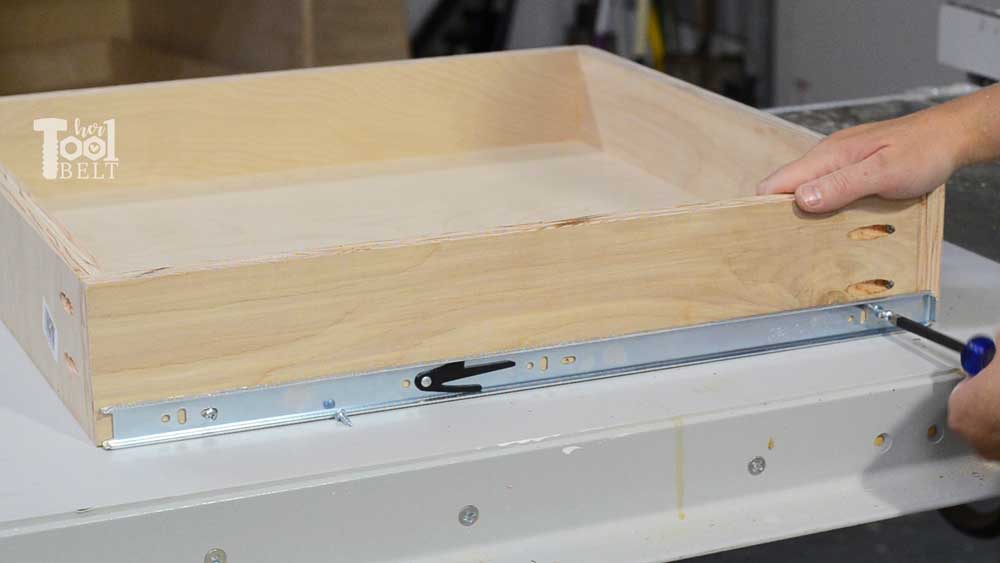
Attach the drawer slides
To make installing the drawer slides easy, I like to place the drawer and inner slide piece on a flat surface to install. I have better luck at installing them straight that way. Align the drawer slide so it has about 1/8″ gap in the back (the inner drawer slide piece doesn’t go all the way to the back of the outer drawer slide piece. Then drill pilot holes and install the slide with screws.
For the peg board, I lined up the inner drawer slide piece to the top of the filler wood and screwed in place.

Then hung that on the corresponding drawer slide in the cabinet. Then I pull out the lower drawer slide that will attach to the bottom of the peg board and secure it to the lower filler wood.
Attaching the doors
Since the doors are so tall, 96″. I used 5 hinges per door. I really like the ease of install and adjust-ability that the euro concealed hinges provide. However a 35 mm forstner bit is needed. I have an old handy template/forstner bit that I bought years ago at Home Depot to install concealed hinges. It was hanging right by the hinges in the cabinet hardware aisle.
I marked the center-line for the hinges 3 1/2″, 24″, 48″, 72″ and 92 1/2″. Then drilled the 35mm hole, make sure to not drill through the plywood, just deep enough for the hinge to fit.
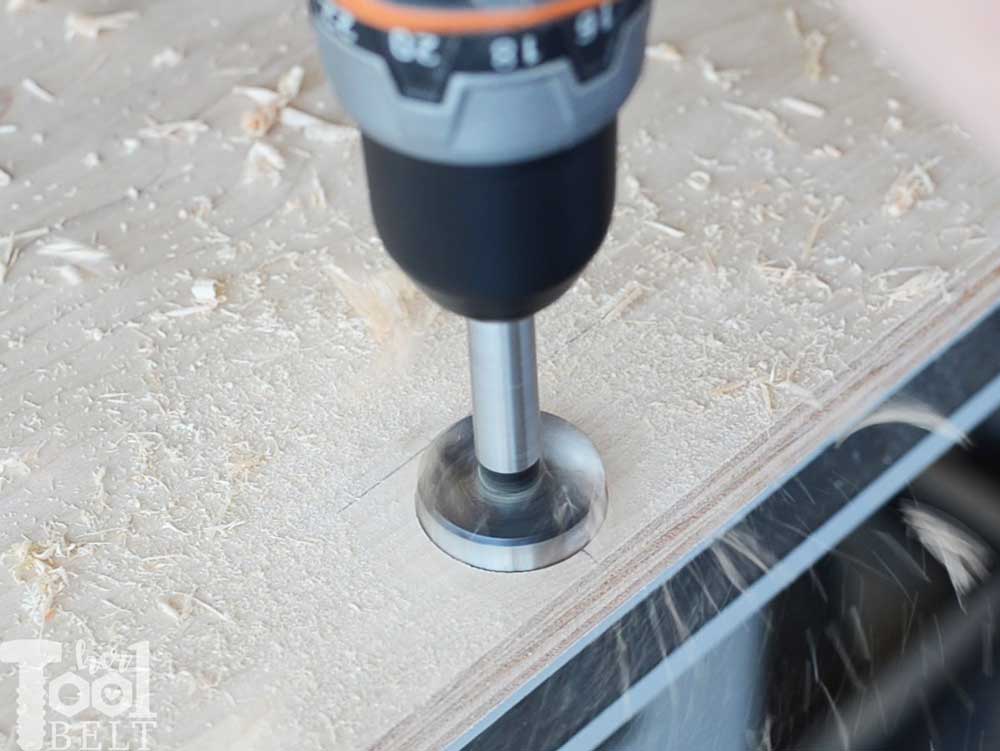
Then I marked the holes for the screws, drilled pilot holes (1/16″ bit) and installed the screws.
On the cabinet, I marked the same center-lines down the inside of the side pieces (measuring from the outside of the side) 3 1/2″, 24″, 48″, 72″ and 92 1/2″. For the hinges I used the screws attached about 1 7/16″ in from the edge of the cabinet. Drill pilot holes for the mounting piece of the hinge.
Install the door to the cabinet and adjust the hinges as necessary.
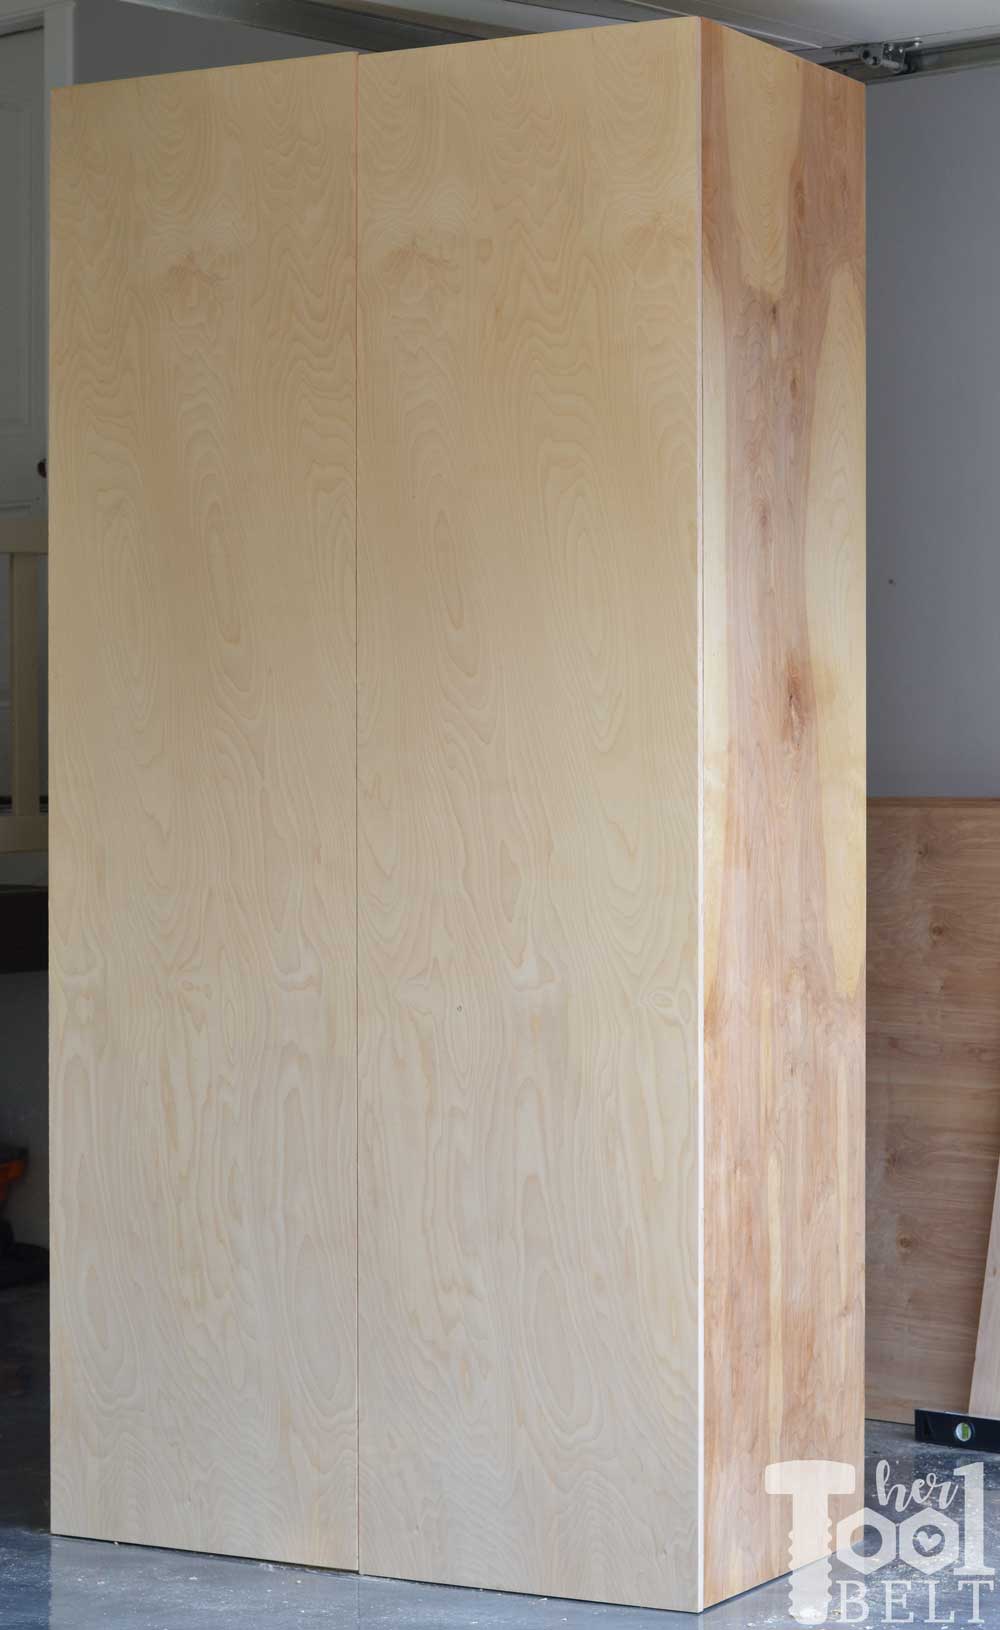
The built cabinet
Before finish.
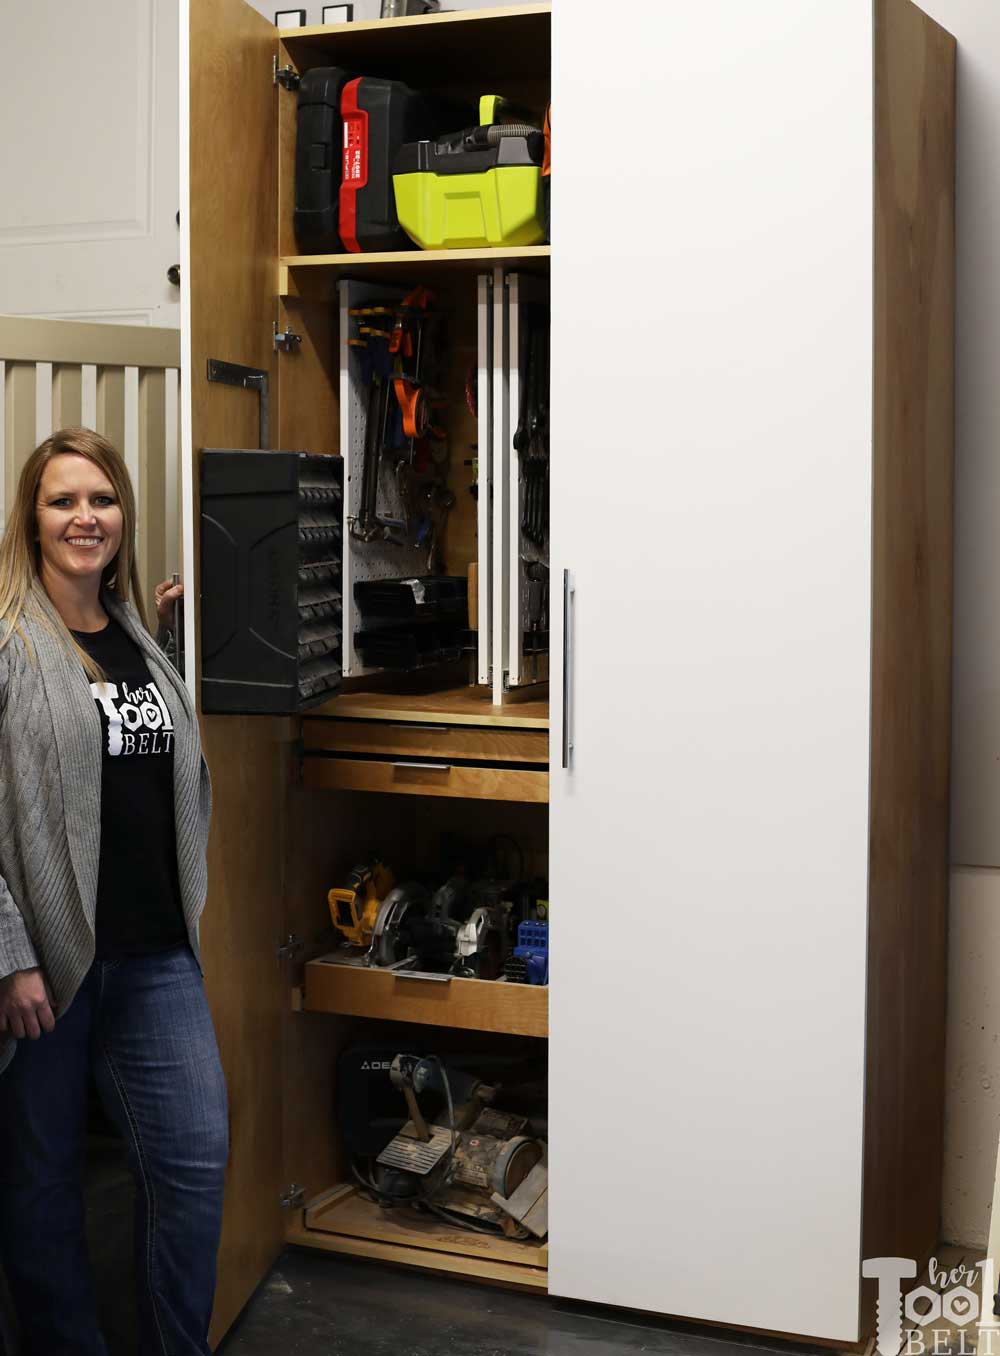
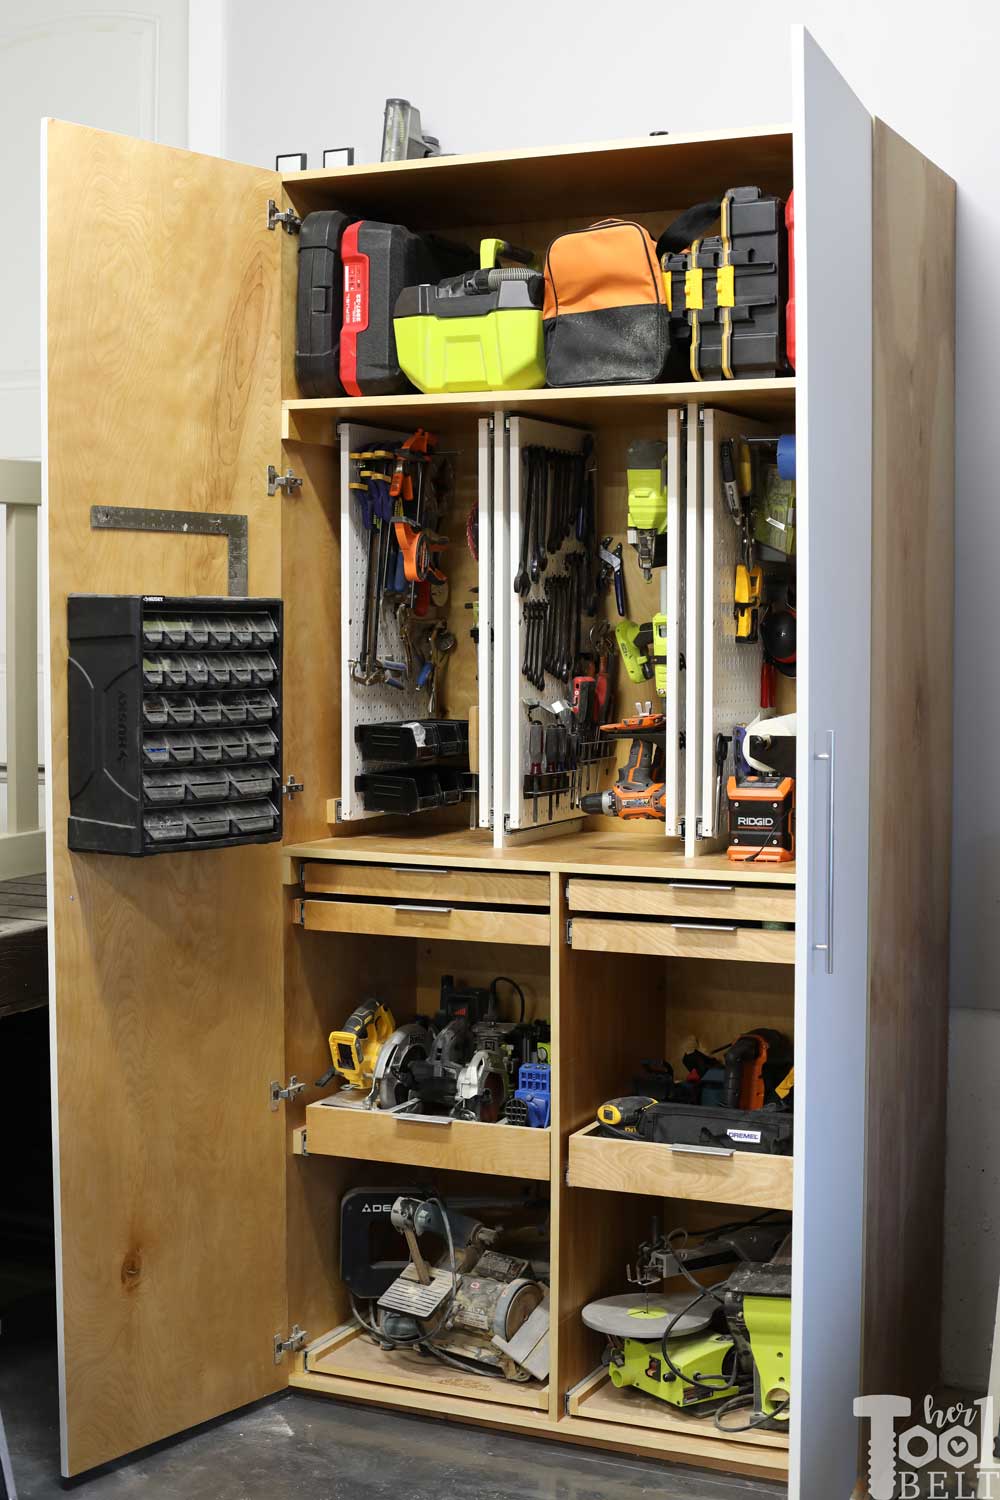
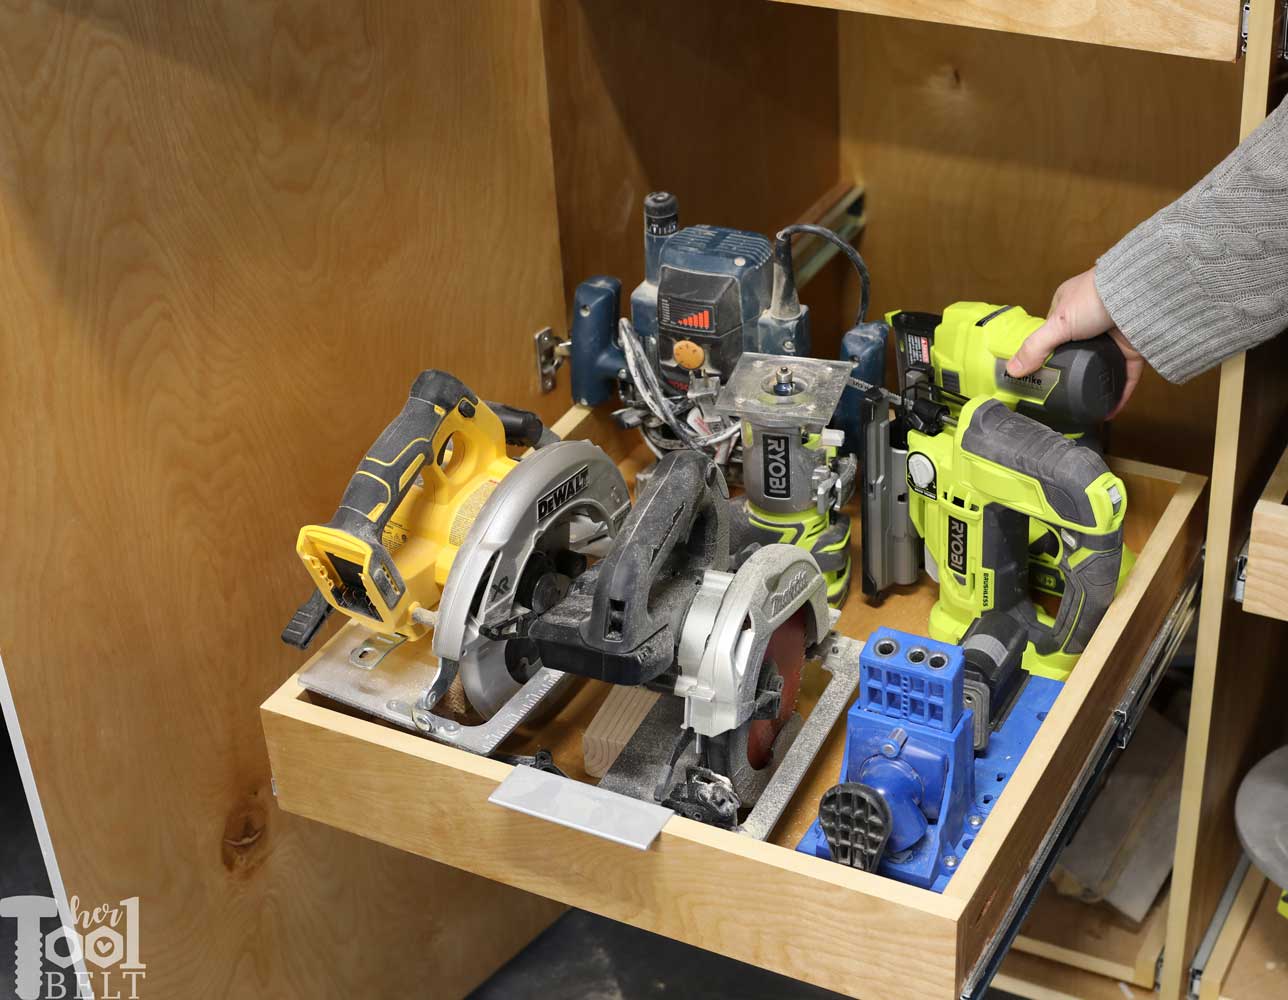
With the doors open, lots of storage room. You can add or take away drawers for your needs.

I love having things pull out, so I don’t have to rummage through cabinet shelves! I did modify my bottom drawer to be a pull out tray…for a specific tool.
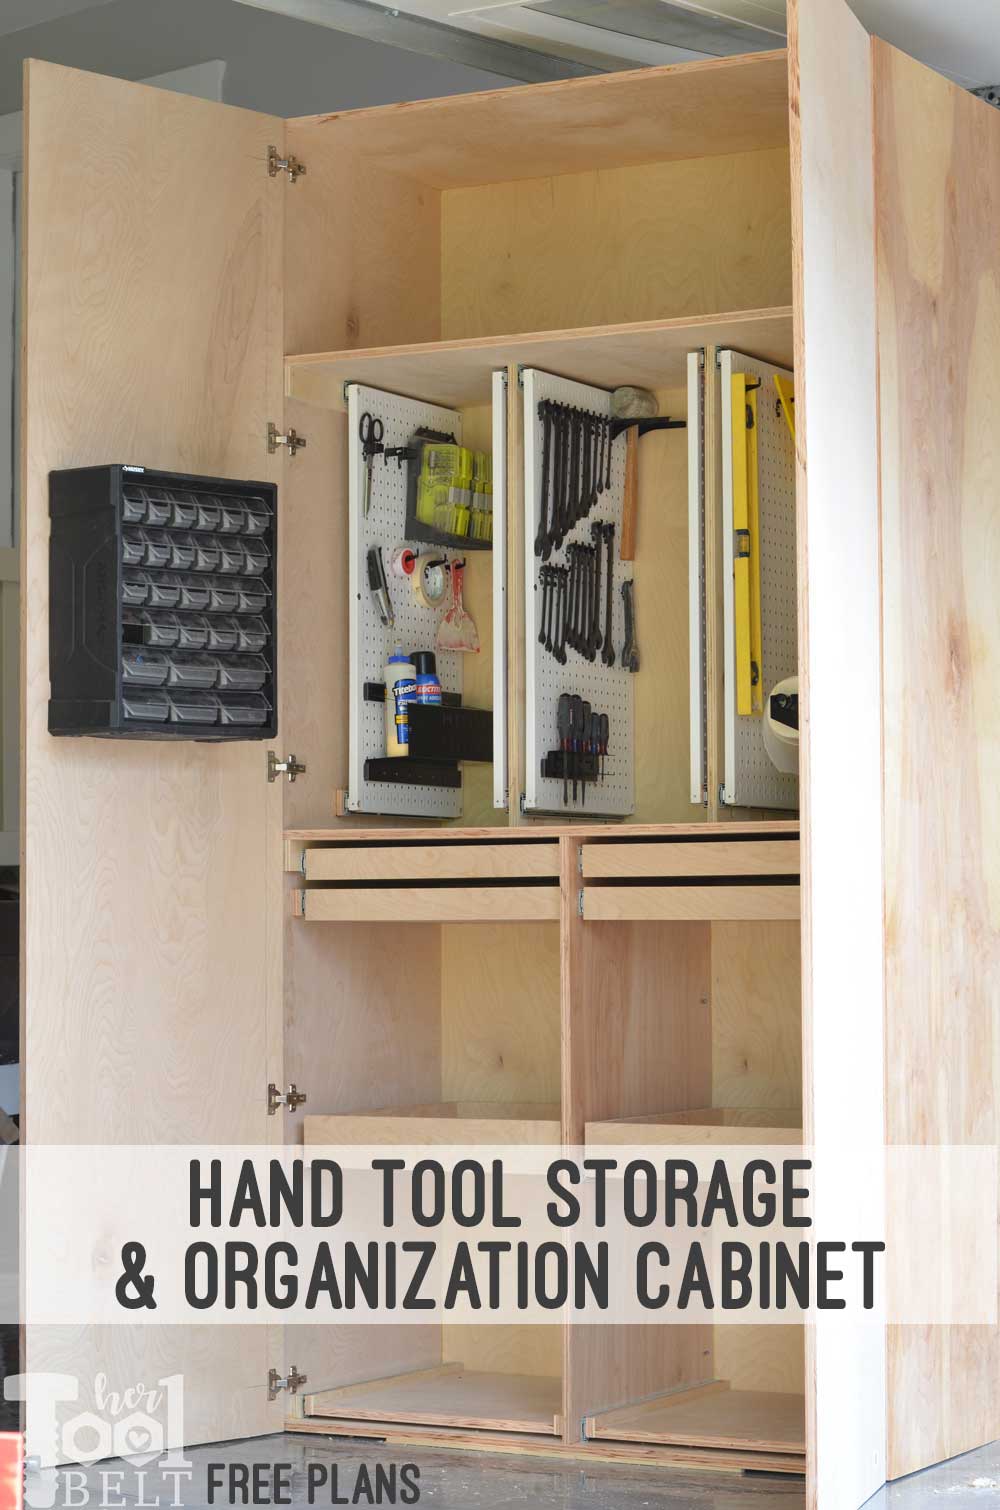
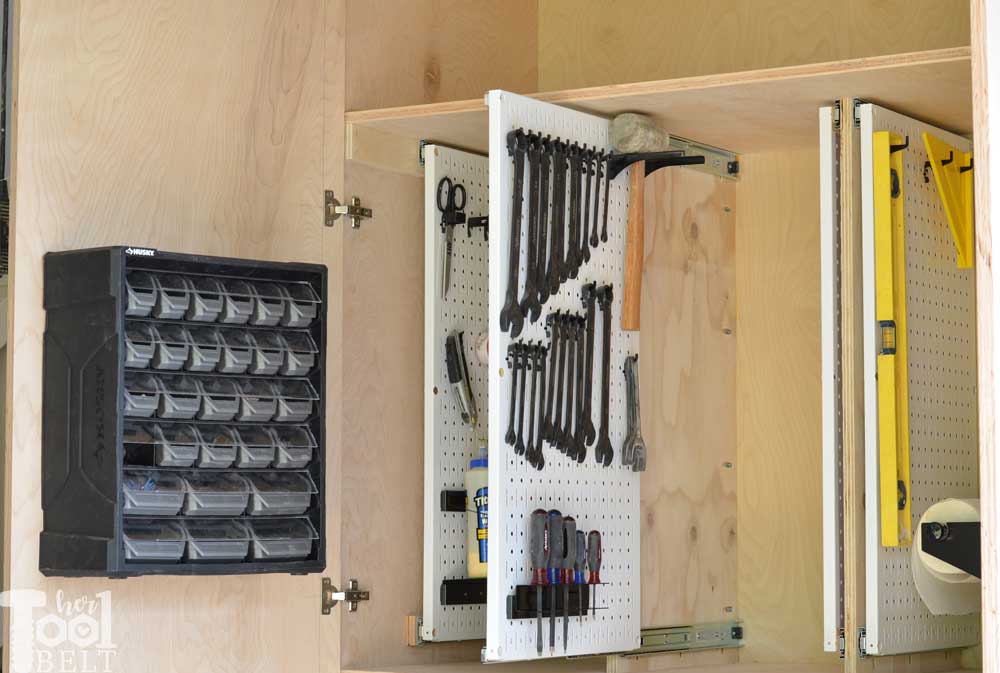
These Wall Control metal pegboards are awesome. I love their accessories because they attach snuggly, but you can also use regular pegboard accessories.
The Finished Cabinet
I painted the doors with exterior white paint.
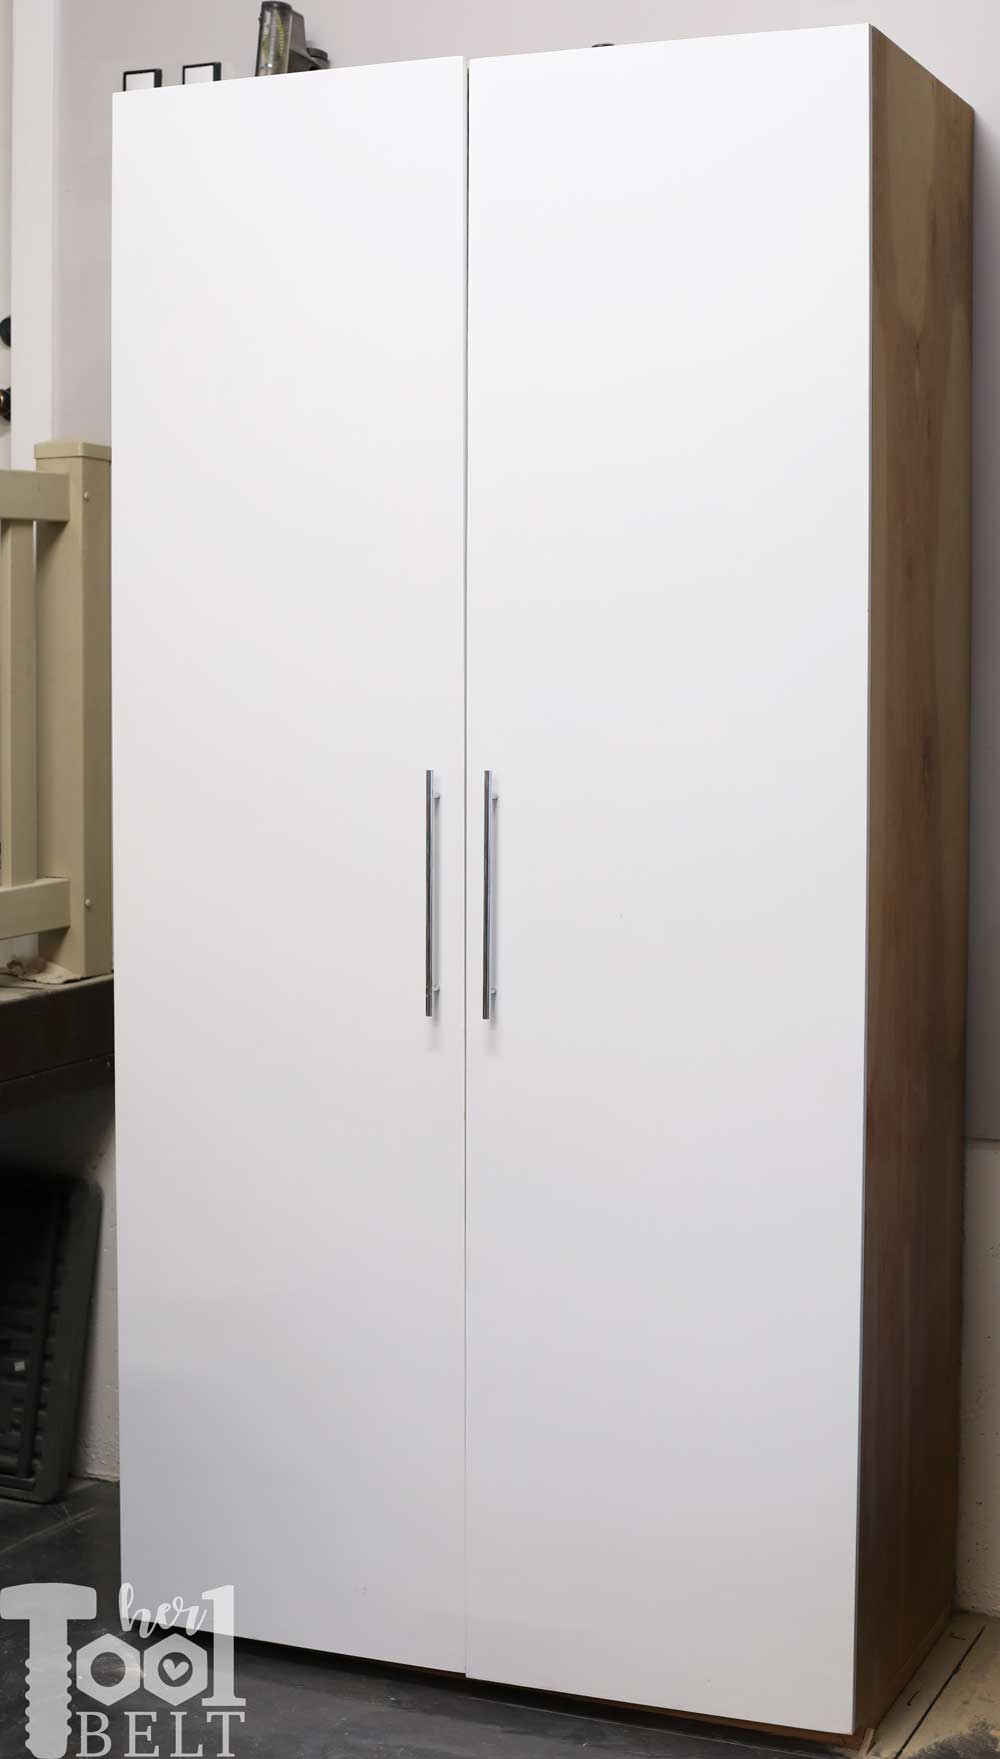
I added 14 1/2″ bar pulls in chrome.
On the inside of the cabinet, I applied edge banding to all of the plywood edges. Then I sanded everything smooth (to about 150 grit) then coated the plywood in Minwax polyurethane.
I added aluminum finger pulls to the drawers.
The middle drawers are nice for storing tools and such. I love the easy access to the back of the drawer without having to rummage.
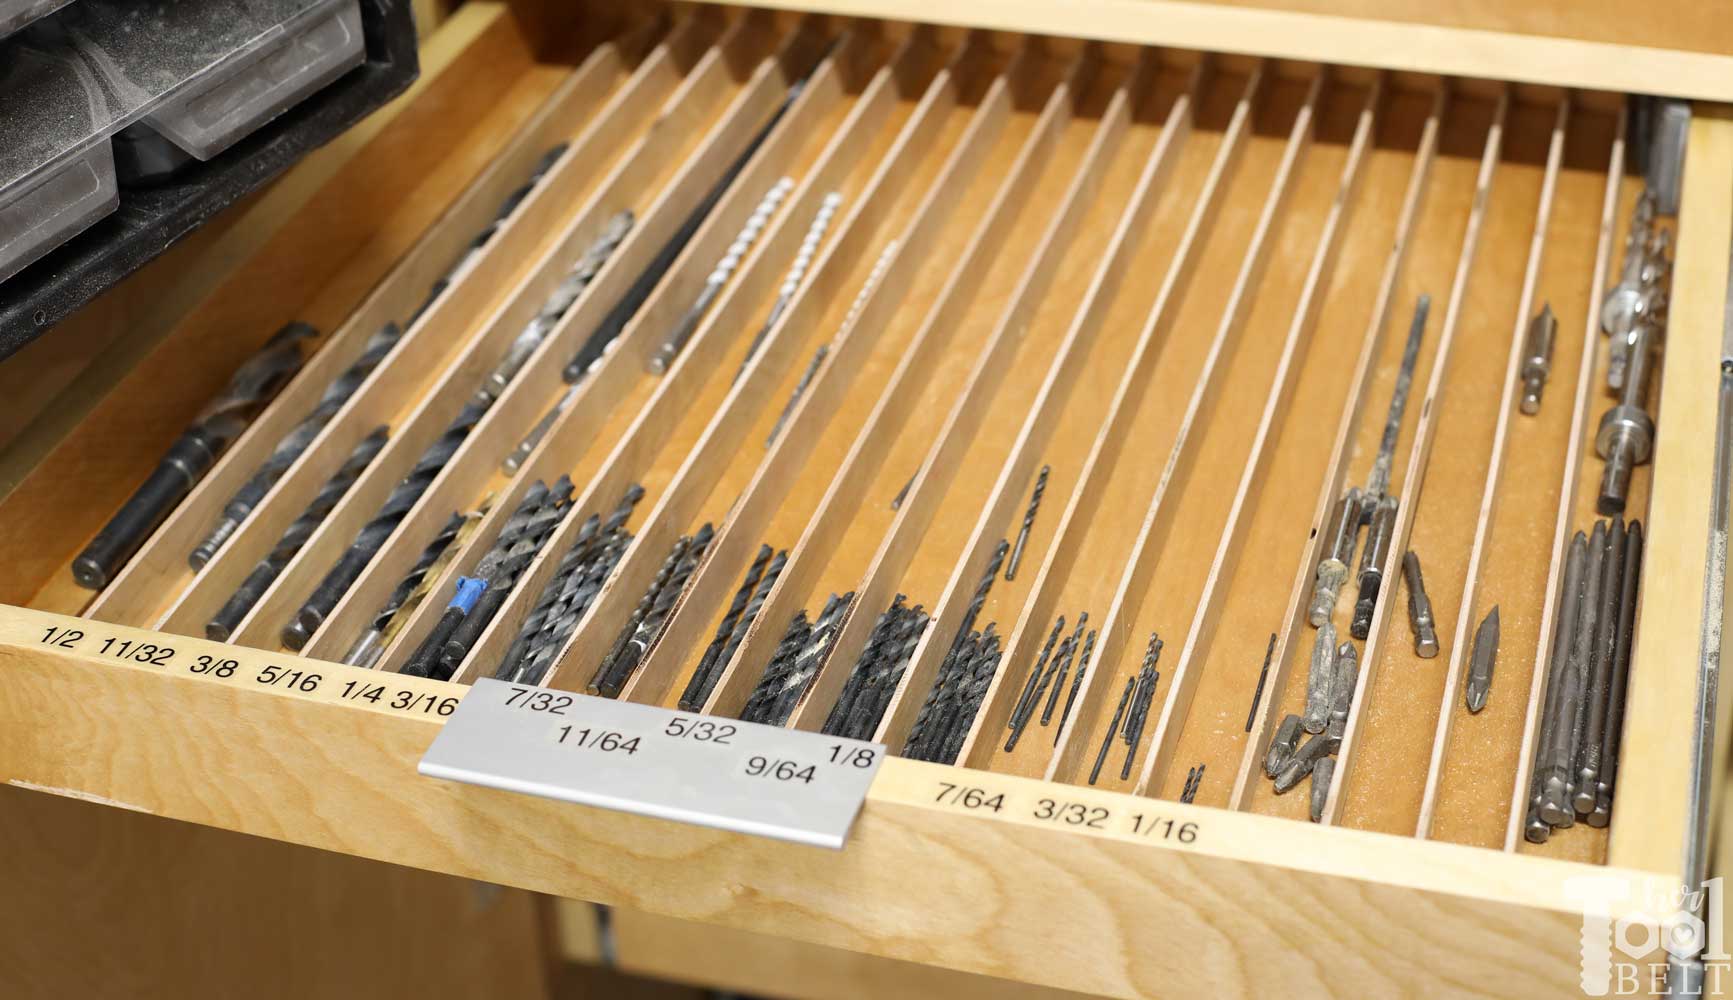
My top shallow drawer is organized for drill bits. I added 2.5 mm plywood for dividers.
The Husky small parts organizer makes sorting screws, biscuits, bolts, nuts, etc so nice.
I really love this cabinet in my garage, it has been huge for helping me organize!
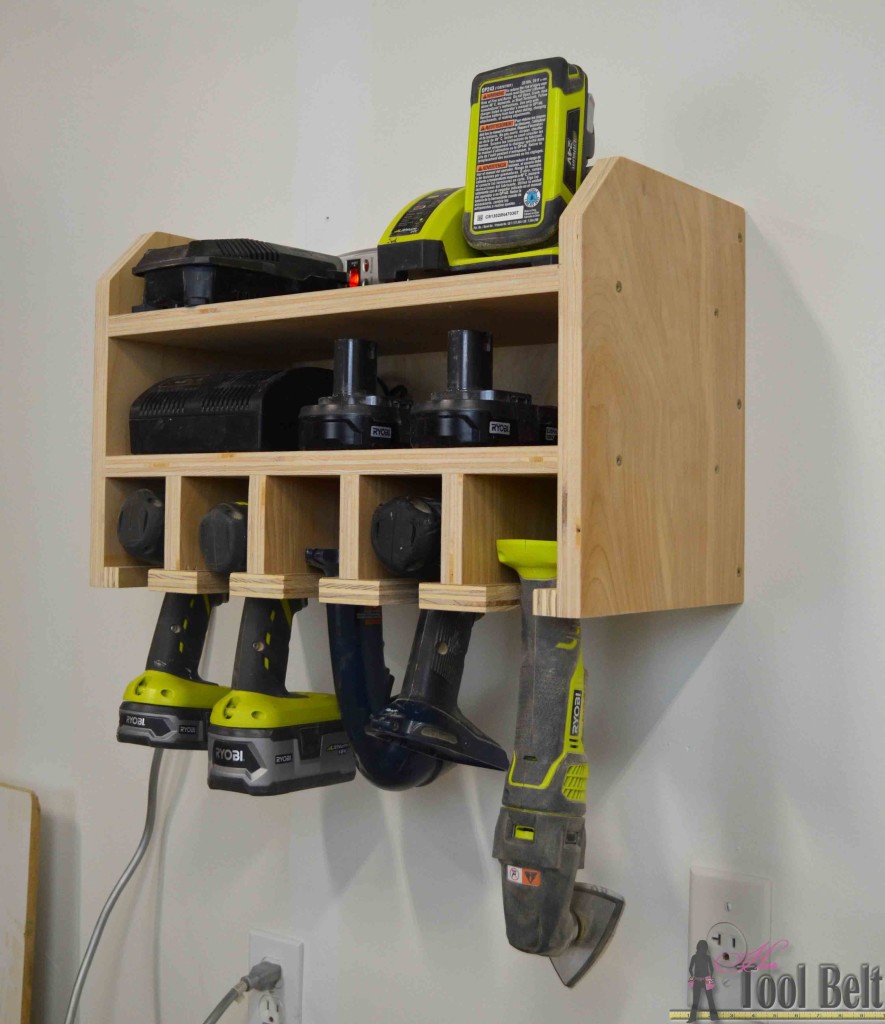
Looking for more organization projects, check out my Drill and battery organizer!
“I acknowledge that The Home Depot is partnering with me to participate in the Tool Review Program. As a part of the Program, I am receiving compensation in the form of products and services, for the purpose of promoting The Home Depot. All expressed opinions and experiences are my own words. My post complies with the Word Of Mouth Marketing Association (WOMMA) Ethics Code and applicable Federal Trade Commission guidelines.”
Related

Original article and pictures take https://www.hertoolbelt.com/garage-hand-tool-storage-cabinet-plans/?mkt_tok=eyJpIjoiWWprMlpXRmxaR1k0TldNeiIsInQiOiJPMW8xTWIraDVhek9uSHlaTXhTT3d5ZDJMVXloem1JMFwvc3llM2hObmI1WG0wWUd2MStIUDNPSnRzQUE5c01EeG5RSlwvTTYwMXY4KzdNTVBFWk1YZkpKTHpwOGVZc29xUVhlZjF5MHBHd09xWkhrcjlDOVUwQm1LS3hPak40SDZnIn0%3D site
Комментариев нет:
Отправить комментарий